Enable Passenger for your domain
DreamHost uses Passenger to simplify the deployment of Flask web apps. The process of enabling Passenger for a site/domain/subdomain can be found in the DreamHost documentation https://help.dreamhost.com/hc/en-us/articles/216385637-How-do-I-enable-Passenger-on-my-domain-. The easiest way might be to select Passenger in the process of creating a domain/subdomain instead of changing it after the creation of the domain.
Install Python3
DreamHost has Python2 installed by default, but it also allows users to install a custom version of Python3. The installation of python or any other related libraries requires the use of SSH (or Secure Shell).
Connection of SSH to the server
There are a large range of SSH clients that you can choose to connect to the server, on systems including MacOS X, Unix/Linux, Windows, Chrome, IOS (iphone), and Android. Here is a quick list in the DreamHost documentation https://help.dreamhost.com/hc/en-us/articles/215360828-SSH-client-software.
There are two ways to connect the SSH to the server:
[server]$ ssh username@example.com
or
[server]$ ssh username@server.dreamhost.com
followed by inputting the password upon pressing “Enter”.
The username and password can be easily found in the DreamHost Panel – Websites – FTP Users & Files.
The server in the second option varies depending on the plan you have with DreamHost. More information can be found in the DreamHost documentation https://help.dreamhost.com/hc/en-us/articles/216041267-SSH-overview. To make it easier, we recommend using the first option whenever possible.
Python3 installation
- After logged into the server via SSH, run the below command one by one to install a custom version of Python3. Below example installs Python 3.9.2. You can change this based on your own needs.
[server]$ cd ~
[server]$ mkdir py3_tmp
[server]$ cd py3_tmp
[server]$ wget https://www.python.org/ftp/python/3.9.2/Python-3.9.2.tgz
[server]$ tar zxvf Python-3.9.2.tgz
[server]$ cd Python-3.9.2
[server]$ ./configure --prefix=$HOME/opt/python-3.9.2
[server]$ make
[server]$ make install
[server]$ echo 'export PATH=$HOME/opt/python-3.9.2/bin:$PATH' >> ~/.bash_profile
[server]$ . ~/.bash_profile
The last two commands set this version of Python as the default for the user, and then reload the file to activate it.
- Now it is the time to check if the wanted version of Python3 as well as the pip3 are successfully installed. To do that, run the commands:
[server]$ which python3
/home/username/opt/python-3.9.2/bin/python3
[server]$ python3 --version
Python 3.9.2
[server]$ pip3 --version
pip 21.2.4 from /home/username/opt/python-3.9.2/lib/python3.9/site-packages/pip (python 3.9)
- Now we can delete the temporary folder
py3_tmpusing the command below:
[server]$ cd ~
[server]$ rm -r py3_tmp
Please also check the DreamHost documentation for more information: https://help.dreamhost.com/hc/en-us/articles/115000702772-Installing-a-custom-version-of-Python-3
Install a virtual environment
To install Flask and any other libraries, a virtual environment may be installed first so that these packages will be isolated from the rest of the applications on the server.
- To do that, we use pip3 that we just installed together with the Python3 in above steps. Before that, pip3 may be upgraded to the newest version first:
[server]$ python3 -m pip install --upgrade pip
- Once upgraded, install virtualenv using pip3:
[server]$ pip3 install virtualenv
- then check it:
[server]$ which virtualenv
- Create the venv itself (change the
usernameto your actual username):
virtualenv -p /home/username/opt/python-3.9.2/bin/python3 venv
- Activate your venv:
[server]$ source venv/bin/activate
Now the name of the current virtual environment appears to the left of the prompt, for example:
(venv) [server]$
- To verify the installation again:
(venv) [server]$ python -V
Python 3.9.2
For more information, check the DreamHost documentation at https://help.dreamhost.com/hc/en-us/articles/115000695551-Installing-and-using-virtualenv-with-Python-3.
Install Flask and other Python libraries
- Make sure the pip3 is upgraded to the newest version, and the correct virtual environment (in this case, the
venv) is activated:
[server]$ python3 -m pip install --upgrade pip
[server]$ source venv/bin/activate
- Now you can install flask into the virtual environment:
(venv) [server]$ pip install Flask
or other libraries (e.g., numpy and pandas):
(venv) [server]$ pip install numpy
(venv) [server]$ pip install pandas
Configure Passenger
- Create a Passenger configuration file (this should be in your home directory in the
example.com):
(venv) [server]$ nano passenger_wsgi.py
- Then enter the following contents in to the
passenger_wsgi.pyfile:
import sys, os
# INTERP = os.path.join(os.environ['HOME'], 'example.com', 'venv', 'bin', 'python3')
INTERP = os.path.expanduser("~/venv/bin/python3")
if sys.executable != INTERP:
 os.execl(INTERP, INTERP, *sys.argv)
sys.path.append(os.getcwd())
sys.path.append('~/example.com/app')
from app.app import app as application

if __name__ == '__main__':
 application.run(debug=False)
- Save and close the file, and make it executable:
(venv) [server]$ chmod +x passenger_wsgi.py
- Because every change in the website requires a restart to reflect the change, here we create a folder
tmpwith a filerestart.txtas the restart button:
(venv) [server]$ cd ~
(venv) [server]$ mkdir tmp
(venv) [server]$ touch tmp/restart.txt
Create the Flask app
- Create a folder called
appin your domain folder (make sure to navigate to the correct directory before doing so):
(venv) [server]$ cd /home/username/example.com
(venv) [server]$ mkdir app
- Create the major app file commonly called
routes.pyorapp.pyin the folderapp, and add following contents (theindex.htmlis the home page of your site):
from app import app

app = Flask(__name__)

#default page of our web-app
@app.route('/')
def home():
 return render_template('index.html')


#Starting the Flask Server
if __name__ == '__main__':
 app.debug = True
 app.run()
- Create another file called
__init__.pyalso in the folderapp, and add the following content:
from flask import Flask

app = Flask(__name__)

from app import routes
Create other related app functions and HTML pages
Above contents can very well guide you to establish a very basic Flask application on DreamHost. You can add more functions or webpages to your site based on your own needs.
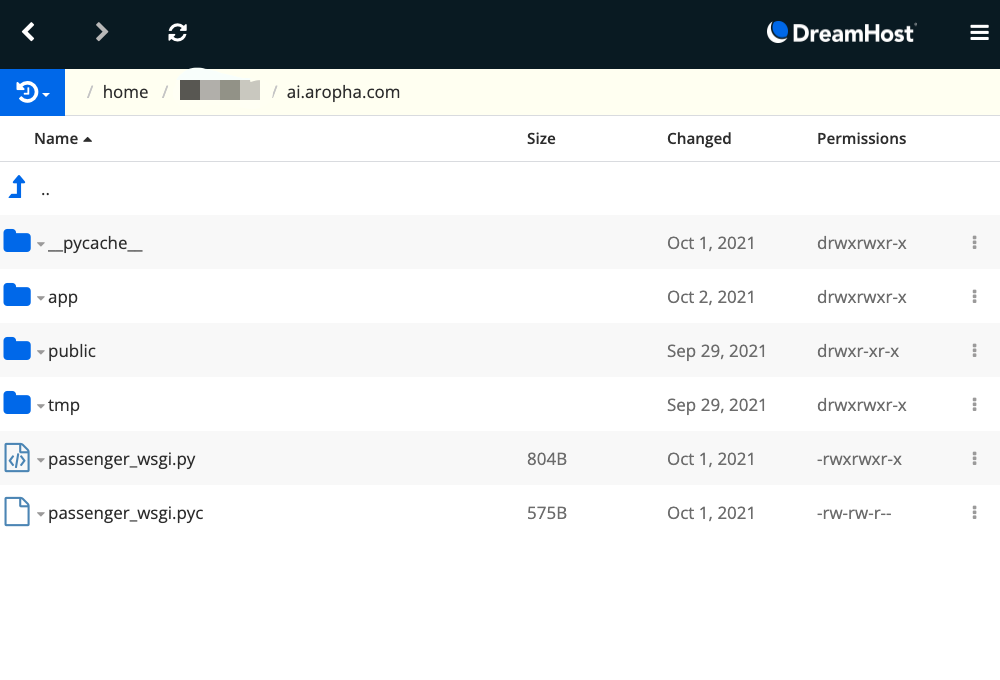
Resulted folder
The resulted folder may look like:
References
- https://help.dreamhost.com/hc/en-us/articles/216385637-How-do-I-enable-Passenger-on-my-domain-
- https://help.dreamhost.com/hc/en-us/articles/215360828-SSH-client-software
- https://help.dreamhost.com/hc/en-us/articles/216041267-SSH-overview
- https://help.dreamhost.com/hc/en-us/articles/115000702772-Installing-a-custom-version-of-Python-3
- https://help.dreamhost.com/hc/en-us/articles/115000695551-Installing-and-using-virtualenv-with-Python-3
- https://www.brettsbeta.com/blog/2020/07/flask-on-dreamhost-shared-website-hosting/
- https://github.com/jprusik/dreamhost-flask-project-template


